So you just got your first fishing rod. Maybe it was a gift, maybe you finally decided to pick up the hobby. Either way, you're staring at a pile of rod pieces, a reel, and a spool of line wondering what to do first. It's more straightforward than it looks.
Setting up a fishing rod properly is the difference between a frustrating day untangling bird's nests and actually enjoying your time on the water. Here's everything you need to know—from assembling the rod pieces to tying the right knots and attaching your hardware. No prior experience required.
Assemble Your Rod and Attach the Reel
Start by putting your rod together. Most beginner rods come in two or three pieces. Take the pieces and align them so the eyelets (the small rings that the line passes through) line up in a straight line.
Slide the sections together, but here's the trick: go slightly off-center with the eyelet alignment at first. As you push the pieces together, twist them slightly to bring the eyelets into perfect alignment. This seats the connection better than forcing them straight on. And whatever you do, don't grab the eyelets themselves when twisting—they can break off easily.
Once your rod is assembled, it's time to attach the reel. For a spinning reel (the most common type for beginners), slide it into the reel seat on the rod handle. Some rods have a sliding ring that tightens down over the reel foot. Others use threaded ringlets. Either way, the reel should hang underneath the rod, which allows you to cast and reel in from below.
Before moving on, check your rod. It usually has a label printed near the handle that tells you the recommended line weight. For example, a light action rod might say "4–10 lb test." This tells you what strength of fishing line to use, so keep that in mind when choosing your line.
Spool the Reel with Fishing Line
Now you need to get the line onto your reel. Start by threading the line through the first eyelet closest to the reel. This keeps tension on the line as you reel it in, which helps it spool evenly.
Flip the bail (that wire arm on the front of the reel) up into the open position before you start.
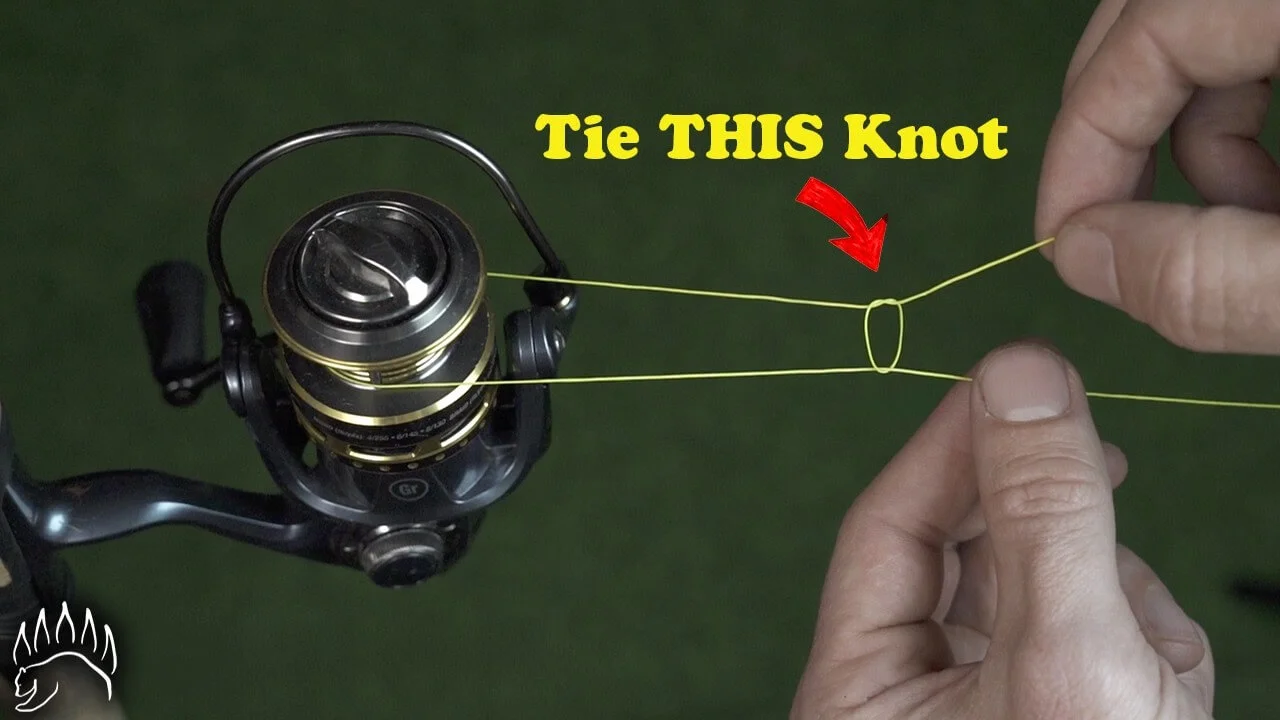
Tie the Arbor Knot
The arbor knot is what attaches your line to the reel spool. It works with monofilament, fluorocarbon, or braided line, so you don't need to worry about matching it to your line type.
Here's how to tie it:
1. Loop the end of your line around the reel spool.
2. Take the tag end (the short loose end) and wrap it over your main line to form a loop.
3. Tie a simple overhand knot on just the tag end itself. Your main line should be passing through the big loop this creates.
4. Pull that tag end to tighten the overhand knot down.
5. Tie a second overhand knot further up on the tag end, creating a small loop.
6. Wet both knots with a little saliva before tightening. This reduces friction and helps the knot seat properly.
7. Pull the main line to cinch both knots together against the spool. You'll see the tag end shrink as the knots jam together.
8. Clip the tag end off close to the knot.
Fill the Spool
Flip the bail back down into the closed position. Pinch the line against the rod with your fingers to keep tension as you reel. This is crucial—loose line creates loose coils on the spool, and loose coils create tangles when you cast.
Start reeling slowly, keeping steady pressure on the line. You can speed up once you get going, but never let the line go slack. Fill the spool until there's about an eighth of an inch of space left between the line and the rim of the spool.
If you overspool—meaning the line comes right up to the edge—you'll get loops of line flying off during a cast, which leads to the dreaded bird's nest. Underspooling isn't as bad, but you'll lose casting distance. That eighth-inch gap is the sweet spot.
Thread the Line and Tie on Hardware
With the reel spooled, thread the line through the remaining eyelets on the rod, working from the one closest to the reel up to the tip. Make sure the line sits inside each eyelet, not wrapped around the rod.
What you tie on next depends on what you're fishing with.
If You're Using Lures That Spin
Lures like spinners and spoons rotate as you retrieve them. If you tie them directly to your line, that spinning motion will twist your line, leading to tangles. The fix is a swivel—a small connector that lets the lure spin freely without twisting your line.
A snap swivel is especially handy because it has a clip that lets you swap lures quickly. Just snap your lure on, fish with it, unsnap it, and snap on something else.
To tie a swivel to your line, use a clinch knot:
1. Thread the line through the eye of the swivel.
2. Put your finger against the hook eye to create a small loop.
3. Wrap the tag end around your main line six or seven times (four or five if you're using thicker line).
4. Slide the tag end back through the loop near your finger.
5. Wet the knot with saliva.
6. Pull the tag end to tighten, then grab the swivel and pull to cinch the knot into place.
7. Clip the tag end.
If You're Fishing with Worms or Bait
If you're using bait like worms that just sit on the bottom, you don't need a swivel because nothing is spinning. Tie your hook directly to the line using the same clinch knot described above.
To add weight, pinch a split shot sinker onto the line about a foot above the hook. Use pliers to crimp it closed—don't use your teeth. And keep those pliers handy for removing hooks from fish later.
Adding a Bobber
A bobber (or float) keeps your bait at a specific depth and tells you when a fish bites. Many beginner bobbers work by pushing down a small button on top to reveal a hook, clipping it onto your line, then pushing the button again to secure it. A second hook comes out the bottom to clip the line underneath.
Slide the bobber up or down the line to adjust depth. In a lake, keep it a few feet above your weight. In a river, adjust so your hook stays just off the bottom.
Set Your Drag
Every spinning reel has a drag adjustment, usually a knob or dial on top of the spool or at the front of the reel. Turn it clockwise to tighten, counterclockwise to loosen.
The drag controls how much resistance a fish feels when it pulls line off the reel. If the drag is too tight, a big fish can snap your line. If it's too loose, the fish can run too far and the hook might fall out.
A good starting point is medium tension—enough that you feel resistance when pulling line, but not so much that you can't pull line off by hand. Adjust from there based on what you're catching. You'll get a feel for it on the water.